This page is for currently established opt-in message administrators within Rhody Connect. Please also refer to the Opt-in Channel Guidelines page for Push Notification Specifications.
Message Best Practices
Aim for messages that:
• Keep the user within the app
• Are actionable
• Are educational/meaningful
• Are user-centric
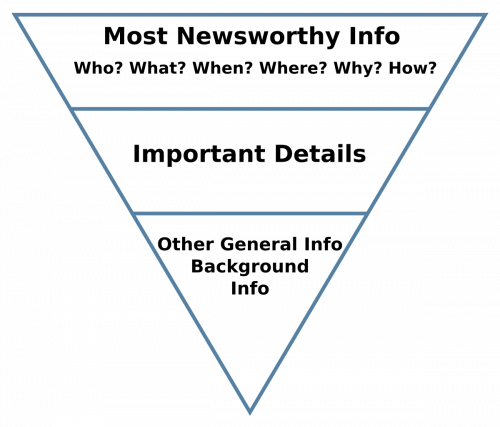
Make sure that messages are created with an inverted pyramid structure to load the most important content towards the beginning of a title. This will make a better hook for a reader.
How does the inverted pyramid method affect your message?
The Title must be less than 120 characters. It should have the most newsworthy/interesting information first and then any additional information second. Organizing your title this way helps assure the best chance of a user clicking on a message, even if some of the content is cut off.
Example:
• Less effective: “Come join Rhody the Ram for a FREE pizza party to celebrate the end of the school year!”
• More effective: “FREE Pizza Party – Celebrate the end of the school year with Rhody the Ram!”
The Description should contain important details of your event and any relevant general information. Try to keep this short to not overload the user’s cognitive load and use line breaks or other custom code for easier skimming of content.
How to Create a Message for an Opt-In Channel
Creating a Message
-
- Log in to the Modo App Center with your Modo Labs login information.
Please note: This is a different login than your URI login and password. - Select Communicate from the top grey banner.
- On the left side of the screen, navigate down to the Opt-In channels option. Select to expand out the section. You will see all Opt-In channels that you have access to.
- Select the channel you want to create a message for.
- Select
- A new screen will load. This is where you will create your Opt-In channel message.
- Content:
- Title: Create a short and catchy title for your message.
- Body: Create your message’s content. (Learn to customize your message with HTML code).
- Tag: N/A
- Category: Select the appropriate message category if appropriate.
- Link Title (Optional): If you have a clickable link – this will become the phrase that is clickable. This should not be generic phrases like “Click Here” or “Link”.
- Link Subtitle (Optional): If you have a clickable link – this is some optional additional text that displays
- Link URL (Optional): If you have a link to add to your message select the appropriate method below:
- Paste in an External Link: Click in the text area and paste in the URL, your link will be highlighted in blue. Click the URL and it will insert itself into the Link URL text area.
- Page in the Rhody Connect app: Click in the text area and scroll until you find the area you are looking for.
- Image (Optional): Upload an image to your message.
- Image must be in JPEG or PNG format, minimum width 800 pixels, maximum file size 2 megabytes.
- Images should be a square or horizontally-oriented image that does not contain any text and should not be a flier.
- Alt Text (Optional – but required if you add an image): Add in a short description of your image. This should not contain the phrase “image” or “image of…”
- Notifications: How do you want your followers to receive your message?
- Notify Via:
- Push Notification: This will push a notification to your follower’s phone regardless of whether the app is open.
- In-app banner displayed on (select a page or app area): This will have an in-app banner display at the top of a page or grouping of pages in the app for your followers. Please refrain from using this feature at this time unless given approval by the mobile app team.
- Notify Via:
- Timing:
- Start at: Self explanatory.
- End At: When should this message stop showing to your followers? (defaults to 1 week)
- Time Zone: N/A – do not change.
- Content:
- Click Save once you are happy with your message. This will save your message so you can preview it and will not be sent out until submitted.
- You will be taken to a preview of your message.
From this page you can:- Close: This will delete your message permanently. You are able to reopen a message immediately after closing as a sanity check, but once you navigate away from the page, the message is officially gone.
- Edit: Edit your message if needed. Double check your message settings if editing as some fields get reset upon editing.
- Send: This will send your message to your followers at the scheduled time.
- Click
 , then
  when ready to publish your message. (If message approval is not required, a
 button will display instead.)
- Log in to the Modo App Center with your Modo Labs login information.
Customizing your Message
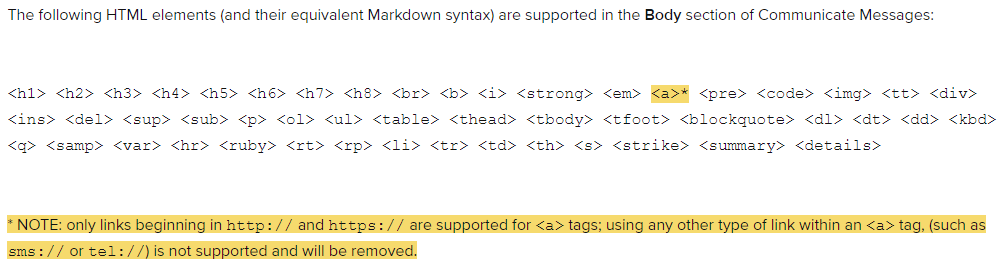
HTML Code
Code Allowed in Opt-In Messages
How to Add Emojis
Be sure to not use emojis as a replacement for words as they may not be interpreted correctly by all users.
- Open the Emoji Unicode Table and find an emoji you want to use in your message.
- Highlight the emoji with your mouse.
- Copy the icon you want to use and paste it into your message’s title or body content. Your emoji should immediately display.
- Continue your message and Save.